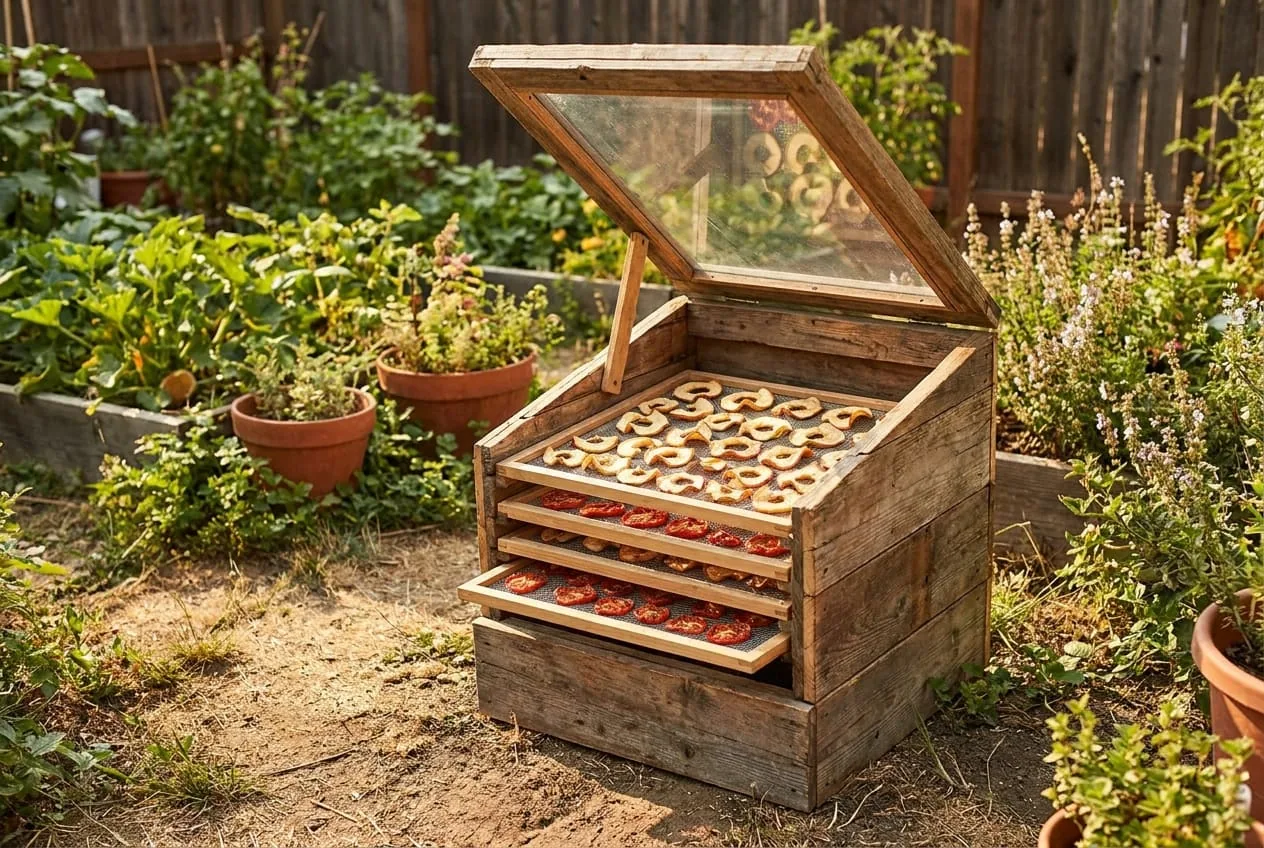
An electric food dehydrator runs on a heating element and fan; at the U.S. average residential price of 18.31 cents per kilowatt-hour in July 2026 (EIA), a 600-watt unit costs about 11 cents per hour to operate — not much in isolation, but it adds up over a long harvest season. A solar dehydrator costs nothing to run once built and requires no electricity. The tradeoff is that it needs good sun and takes longer than a forced-air electric unit. Whether that tradeoff works for you depends on your climate and how much flexibility you have in your drying schedule.
This guide covers two proven designs — a simple screen-and-frame dryer for beginners and a box-style solar collector for serious production — with real materials costs, USDA-based food safety guidelines, and honest expectations about drying times.
Short answer: You can build a working solar food dehydrator for $20–$40 (open screen frame) or $85–$130 (enclosed box) in materials, and on a hot, sunny day it can dry fruit and herbs using no electricity at all. Vegetables and meats are best dried indoors in an oven or dehydrator (National Center for Home Food Preservation). The catch is climate: solar drying excels in hot, dry conditions but struggles in humid or overcast weather, where a hybrid solar-plus-electric approach works best.
How Does Solar Drying Actually Work?
Electric dehydrators push heated air over food at controlled temperatures, removing moisture predictably. Solar dehydrators do the same thing with sunlight, using one of two mechanisms:
Direct solar drying places food in a screened frame exposed directly to the sun. The sun heats both the food and the surrounding air, and wind carries moisture away. This is the simplest and cheapest approach, but it exposes food to insects and UV degradation, and it works poorly in humid conditions or partial cloud cover.
Indirect solar drying uses a separate solar collector — a dark-painted box or panel behind glass — to heat air before it reaches the food. The food sits in a shaded drying chamber, protected from direct UV and insects, while warm air flows through from the collector. This produces better results for most produce, better color retention, and cleaner end product. It’s also a slightly more involved build.
The enclosed design tends to maintain higher, steadier temperatures, but it is still weather-dependent. The National Center for Home Food Preservation notes that fruits’ high sugar and acid content makes them safe to dry outdoors when conditions are favorable, while vegetables (except vine-dried beans) and meats should be dried indoors under the controlled conditions of an oven or dehydrator (National Center for Home Food Preservation).
Design 1: The Screen Frame Dryer — $20 to $40
The simplest functional solar dryer is a wooden frame with fine mesh screen stretched across it, raised on legs or props to allow airflow underneath.
Materials:
- 1×4 lumber for the frame (about $10–$15 at a home center)
- Food-safe screen — the best choices are stainless steel, Teflon-coated fiberglass, and plastic; avoid galvanized “hardware cloth,” copper, and aluminum, which tends to discolor and corrode (National Center for Home Food Preservation) ($5–$10 for a roll)
- Staple gun and staples ($5–$10 if you don’t have one)
- Cheesecloth or lightweight muslin for a cover layer to keep insects out
Construction: Build a simple rectangular frame from 1×4 boards, joining corners with screws. Stretch the screen tightly across the frame and staple every few inches. Prop the frame at a slight angle facing south to maximize sun exposure. Lay a second piece of cheesecloth loosely over the top to block insects while still allowing airflow.
What it’s good for: Herbs, thin apple slices, and other fruit that dries quickly. Do not use it for jerky or other meat: meats are high in protein, making them ideal for microbial growth when heat and humidity can’t be controlled, and they should be dried indoors (National Center for Home Food Preservation).
The real limitation: Open-frame dryers work well in hot, dry, breezy conditions; outdoor fruit drying needs at least 85°F and does best below 60 percent humidity, and food should be covered or brought under shelter at night so cool night air doesn’t add moisture back (National Center for Home Food Preservation). In humid climates — the Southeast, Pacific Northwest, or anywhere with afternoon thunderstorms — food in an open frame dries poorly. In humid conditions, you need the enclosed box design or an indoor dehydrator.
Design 2: The Box Solar Dehydrator — $60 to $120
This is the more controlled of the two designs and handles a wider range of conditions. The basic structure has two components: a solar collector and a drying chamber.
The solar collector is a slanted, south-facing box with a transparent top (polycarbonate or glass) and a dark-painted interior. Sunlight passes through the top, heats the dark surface, and warms the air trapped inside. That warm air rises toward a vent that opens into the drying chamber.
The drying chamber is a separate enclosed box with removable trays stretched with screen. Air flows in from the bottom of the collector, across the food-covered trays, picking up moisture, and exits through vents at the top.
Materials list (for a unit with 4–6 drying trays):
| Material | Estimated Cost |
|---|---|
| Exterior-grade ¾-inch plywood (one 4×8 sheet) | $35–$50 |
| Polycarbonate glazing panel for collector top | $20–$35 |
| Black spray paint (flat/matte for collector interior) | $5–$8 |
| Food-safe screen for trays (stainless, Teflon-coated fiberglass, or plastic) | $8–$12 |
| 1×2 lumber for tray frames | $8–$12 |
| Hardware: hinges, screws, ventilation mesh | $10–$15 |
Total materials: approximately $85–$130, depending on local prices. If you have scrap plywood or reclaimed materials, the cost can drop significantly.
Sizing guidance: A unit with four trays at 18×24 inches each gives you approximately 12 square feet of drying surface — enough to handle a meaningful harvest at one time. Each additional tray pair adds surface without requiring a larger footprint.
Building the collector:
- Build a rectangular box with a slanted top — the front (south-facing edge) sits lower than the back. Aim for a 20–30 degree angle from horizontal, roughly matching your latitude.
- Line the interior bottom with sheet metal or hardboard and paint it flat black. Flat (not glossy) black absorbs more solar energy.
- Cover the top opening with polycarbonate glazing, sealed at the edges with weatherstrip foam. A hinged panel makes cleaning easier.
- Cut a vent opening at the top edge of the collector that connects to the drying chamber.
Building the drying chamber:
- Build a separate vertical box that attaches to the back of the collector.
- Cut a lower opening that aligns with the collector’s top vent — warm air flows in here.
- Cut upper exhaust vents near the top of the chamber, covered with screen to exclude insects.
- Build removable tray frames from 1×2 lumber, stretch screen across each, and install horizontal cleats inside the chamber to hold them at spacing intervals.
The entire build takes a competent woodworker a long day; first-time builders should budget more time.
What to Dry, and Realistic Drying Times
Solar drying takes longer than electric drying. This is the honest expectation gap that most guides don’t address clearly.
Electric dehydrators dry foods at about 140°F (National Center for Home Food Preservation). A solar unit’s temperature swings with sun, air temperature, and humidity, so check it with a thermometer; drying fruit outdoors typically takes several days (National Center for Home Food Preservation). Temperature and humidity determine drying time.
| Produce | Preparation | Electric Dehydrator | Good Solar Day | Overcast/Humid Day |
|---|---|---|---|---|
| Apple slices (¼ inch) | Core, peel, slice | Hours | Longer than electric | Days, or finish indoors |
| Tomatoes (halved) | Halve, salt lightly | Hours | Dry indoors | Dry indoors |
| Herbs (basil, oregano) | Whole leaves | Hours | Longer than electric | Days, or finish indoors |
| Hot peppers (whole) | Slice and halve | Hours | Dry indoors | Dry indoors |
| Jerky (¼ inch strips) | See NCHFP jerky directions | Hours | Not recommended | Not recommended |
The “not recommended” for jerky is important. Meats are not recommended for outdoor drying (National Center for Home Food Preservation). Make jerky indoors, and make sure the meat reaches 160°F internally: either heat the strips in marinade before drying, or after drying heat strips cut 1/4 inch thick or less for 10 minutes in an oven preheated to 275°F (National Center for Home Food Preservation).
Food Safety: What the USDA Says
Solar drying is suited to fruit; vegetables (except vine-dried beans) and meats carry more spoilage risk outdoors and belong in an oven or dehydrator (National Center for Home Food Preservation). The same fundamentals apply to both methods — and they matter more in a solar context because temperatures are less controlled.
Wash everything before drying. Surface bacteria are the primary concern, and washing produce in clean water removes most of them before drying begins.
Pre-treat fruits to prevent browning. Dip sliced apples, pears, and peaches in a solution of ascorbic acid (vitamin C powder) and water, mixed per the product directions, before placing on trays. This is primarily a quality issue (color and flavor), not a safety one, but properly pre-treated fruit stores significantly better.
Dry to the right moisture level. Vegetables should be brittle and snap when bent. Fruits should be pliable but not sticky — the “leathery” texture most guides describe. If it feels moist in the center when you tear a piece, it needs more time.
The conditioning step matters. After removing fruit from the dryer and letting it cool, pack it loosely in a jar, seal it, and let it stand for 7 to 10 days, shaking daily. Conditioning equalizes moisture and reduces the risk of mold (National Center for Home Food Preservation). If condensation forms inside the jar, the food needs more drying. Skipping this step and sealing moist food in airtight containers is how mold destroys a whole batch of otherwise good work.
Store properly. Dried produce stored in airtight containers in a cool, dry, dark location keeps well. Recommended storage times for dried foods range from 4 months to 1 year; most dried fruits keep 1 year at 60°F but 6 months at 80°F, and vegetables have about half the shelf life of fruits (National Center for Home Food Preservation).
Recommended Equipment and Supplies
Even with a solar unit, a few pieces of equipment make the process significantly easier:
| Item | Purpose |
|---|---|
| Instant-read thermometer (Amazon) | Verify internal temperature of your dryer — the single most useful diagnostic tool |
| Food-grade silicone dehydrator sheets (Amazon) | Line trays for sticky foods like tomatoes or fruit leather — prevents sticking without chemical coatings |
| Vacuum sealer bags (Amazon) | Extend shelf life dramatically for dried herbs and fruit — removes the oxygen that degrades quality |
| Wide-mouth mason jars (Amazon) | Standard storage container for dried food — airtight when sealed, easy to inspect for moisture |
| Ascorbic acid powder (Amazon) | Pre-treatment for light-colored fruits — prevents enzymatic browning during and after drying |
If your climate is too humid or inconsistent for reliable solar drying, a budget electric dehydrator makes sense as a complement rather than a replacement. The Cosori Premium Food Dehydrator (Amazon) is a popular budget option.
When Is Solar Drying Worth It (and When Isn’t It)?
Be realistic about your situation before building.
Solar drying is a good fit if:
- You’re in a hot, dry climate with predictable summer sun (Southwest, Great Plains, California valleys, Mediterranean-climate zones)
- You have a large surplus harvest that you want to process cheaply over several days
- You’re committed to reducing electricity use and have the flexibility to work around weather
Solar drying is the wrong tool if:
- You live in a humid climate (Southeast US, Pacific Northwest) and expect consistent results on a set timeline
- You’re drying meat or vegetables, which should be dried indoors in an oven or dehydrator
- You need to process a harvest quickly (a solar unit that takes 3 days in cloudy weather is useless if rain is coming)
The practical answer for most homesteaders is a hybrid approach: solar dry when conditions are ideal, finish in an electric dehydrator or low oven when they aren’t. This gets you the energy savings on clear summer days without the crop loss risk of depending entirely on weather.
Connecting Solar Drying to Your Broader Food System
Solar drying pairs well with two other preservation methods already covered on this site: fermentation handles the produce that dries badly (cucumbers become pickles, not chips), and a root cellar handles the crops that store better whole.
The overlap is intentional — these are complementary tools, each suited to different produce types and storage windows. Our food preservation without electricity guide maps out which methods work best for which crops, and our The Lost SuperFoods review is worth reading if you want a single curated reference for historical preservation methods, many of which predate electricity.
The goal of a well-stocked homestead food system isn’t to pick one method and apply it to everything. It’s to understand what each method is good at, and apply the right one to each crop.
Frequently Asked Questions
- How much does it cost to build a solar food dehydrator?
- By our materials estimate, a simple screen-and-frame dryer costs about $20–$40 in lumber, food-safe screen, and staples. A box-style solar dehydrator with a collector and drying chamber runs roughly $85–$130 in new materials, and scrap or reclaimed plywood can bring that down.
- How long does it take to dry food in a solar dehydrator?
- It depends on the produce and the weather. Drying fruit outdoors takes several days and needs hot, dry, breezy conditions: a minimum of 85°F and humidity below 60 percent are best. In overcast or humid conditions drying slows sharply, which is why solar drying suits dry, sunny climates best.
- How hot does a solar food dehydrator get?
- It depends on sun, air temperature, humidity, and the build. Check it with a thermometer: an electric dehydrator dries foods at about 140°F, and a solar unit on a hazy or cool day will run well below that, which slows drying significantly.
- Is solar-dried food safe to eat?
- Fruit can be, because its high sugar and acid content makes it safe to dry outdoors when conditions are favorable. Vegetables (except vine-dried beans) and meats are not recommended for outdoor drying; dry them indoors in an oven or food dehydrator. For jerky, the meat must reach 160°F internally, either by heating strips in marinade before drying or heating dried strips in a 275°F oven.
Sources & references
- National Center for Home Food Preservation, Sun Drying (opens in new tab)
- National Center for Home Food Preservation, Food Dehydrators (opens in new tab)
- National Center for Home Food Preservation, Jerky (opens in new tab)
- National Center for Home Food Preservation, Packaging and Storing Dried Foods (opens in new tab)
- U.S. EIA, Average price of electricity to ultimate customers (opens in new tab)
Before you go
The Renter's Homestead Pack
Self-reliance projects for the yard you don't own — container yields, a raised bed built to move with you, balcony preservation basics, and the landlord questions to ask first.
Free guide
The Renter's Homestead Pack
Self-reliance projects for the yard you don't own — container yields, a raised bed built to move with you, balcony preservation basics, and the landlord questions to ask first.