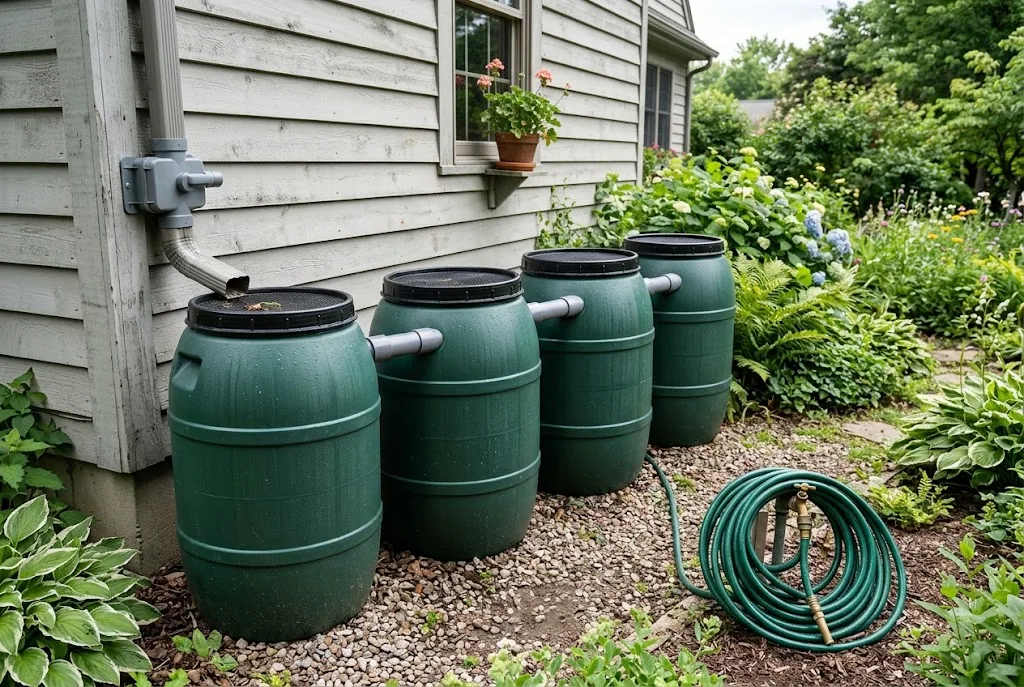
One rain barrel fills early in a real storm and then overflows for the rest of it. If you have already built a single barrel and watched hundreds of gallons run straight down the downspout, the next move is obvious: scale up. A linked multi-barrel system captures far more of what falls, and it does not have to cost much.
Short answer: connect several barrels bottom-to-bottom so they fill as one large reservoir, add a first-flush diverter to keep the dirtiest runoff out, and route overflow away from your foundation. Three linked 50-gallon barrels store 150 gallons; four store 200 — enough to carry a vegetable garden through a dry spell for free.
Disclosure: the product links below are affiliate links, and the guidance here reflects standard rainwater-harvesting practice rather than a lab test of one specific kit. If you are starting from zero, read our single rain barrel build first, then come back to expand it.
Why Go Multi-Barrel
A single 50-gallon barrel is a great proof of concept and a poor reservoir. The math is what makes the case: every inch of rainfall on 1,000 square feet of roof yields about 600 gallons (USGS puts one inch on an acre at about 27,154 gallons (USGS)). A one-barrel setup captures 50 of those and wastes the rest. Linking barrels lets you keep a meaningful fraction of a storm, which is the difference between “topping up a watering can” and “irrigating the whole bed through August.”
There is a water-quality upside too. A larger stored volume that you draw down steadily stays fresher than a small barrel that sits full and stagnant between storms.
What You’ll Need
You can build this from standard parts — most of it overlaps with our backyard water, blackout, and garden starter gear list if you are outfitting from scratch. The core shopping list:
- Two to four matching barrels (matching makes linking and leveling far easier)
- A downspout diverter kit to route roof water into the first barrel and return overflow automatically
- A first-flush diverter to shed the dirty initial runoff
- Bulkhead fittings and short hose to link barrels bottom-to-bottom
- Fine mesh screen, a spigot, cinder blocks or lumber for the base
- A drill, hole saw, and PTFE tape for watertight fittings
Step 1: Plan Capacity and Base
Decide your target volume, then pick the downspout that drains your largest roof section. Build one level base for all the barrels — they must sit at the same height to fill and drain evenly. Elevate the whole row 12–18 inches so gravity feeds the spigot, and make the base sturdy: water weighs about 8.3 pounds per gallon, so a full 50-gallon barrel is over 400 pounds. Four of them is more than 1,600 pounds sitting on your platform.
Step 2: Add the First-Flush Diverter
This is the upgrade that separates a real system from a barrel under a gutter.
A first-flush diverter fills a small holding chamber with the initial runoff, and once that chamber is full, clean water flows past it into your barrels. You drain the chamber between storms. It is a simple, cheap piece that the CDC recommends considering to improve the quality of collected rainwater (CDC).
Step 3: Divert Into the First Barrel
Cut the downspout at the height of the first barrel’s inlet and install the diverter kit.
A diverter (rather than a simple open downspout dumping into the lid) means the system self-manages overflow: when the barrels are full, water simply continues down the original downspout path instead of flooding your foundation.
Step 4: Link the Barrels
Connect the barrels bottom-to-bottom using bulkhead fittings and short lengths of hose. Because water seeks its own level, linked barrels fill and drain as a single reservoir — the first barrel does not overflow while the others sit empty. Put the downspout diverter into the first barrel and the main overflow on the last barrel, directed well away from the house with a length of hose.
Step 5: Screen, Seal, and Add a Spigot
Cover the inlet and overflow openings with fine mesh to block mosquitoes and debris, and make sure every lid seals with no gaps. Fit a spigot near the base of the end barrel for a hose or watering can. A sealed, screened system is what keeps rainwater harvesting from becoming a mosquito nursery; the CDC advises tightly covering rain barrels and using mesh with holes smaller than an adult mosquito on any opening (CDC).
Step 6: Test It
Run a hose into the diverter or wait for the next storm, then check the whole system: barrels filling evenly, first-flush chamber diverting the initial runoff, overflow routing away from the foundation, and every fitting bone dry. Tighten anything that weeps.
Using and Maintaining the System
Draw the water down regularly — active use keeps it fresh and keeps mosquitoes out. The easiest way to do that is to run the spigot into a DIY drip irrigation system so stored rainwater waters the beds on its own. Between storms, empty the first-flush chamber and glance at the screens. Once or twice a season, open the barrels and rinse any sediment. Remember the rule: this is irrigation water, not drinking water. For household water security you also want proper emergency water storage kept separately and safely.
A multi-barrel system is one of the highest-return backyard projects there is: a weekend of work and a modest parts budget turn every storm into free water for your garden, all summer long.
Frequently Asked Questions
- How much water can a multi-barrel system realistically collect?
- More than most people expect. Every inch of rain on 1,000 square feet of roof produces roughly 600 gallons, so even a modest storm can fill a three- or four-barrel system in a single event. The limit is usually your storage capacity, not the rainfall — which is exactly why linking barrels pays off.
- Why add a first-flush diverter if I already have a screen?
- A screen stops leaves and mosquitoes; it does nothing about the dissolved grit, bird droppings, pollen, and roof residue in the first rush of runoff. A first-flush diverter sets that dirtiest initial water aside before it reaches your barrels, so the stored water is cleaner for garden use and the barrels need cleaning less often.
- Can I drink water from a rain barrel system?
- No. Roof-collected rainwater picks up contaminants from shingles and the air, so it is for irrigation only, even with a first-flush diverter. The CDC notes rainwater is not necessarily safe to drink without first removing germs and chemicals. If you ever needed to make it potable you would have to filter and disinfect it separately. Treat barrel water as garden water and use it actively rather than storing it for weeks.
- How do I keep linked barrels from breeding mosquitoes?
- Seal the system. Cover every inlet and overflow with fine mesh secured tightly, keep lids gapless, and use the water regularly so it never sits stagnant for long; the CDC advises screening the inlet or emptying the barrel at least every 10 days. Mosquito problems usually trace back to an open gap, not to the barrels themselves.
Sources & references
Before you go
The Renter's Homestead Pack
Self-reliance projects for the yard you don't own — container yields, a raised bed built to move with you, balcony preservation basics, and the landlord questions to ask first.
Free guide
The Renter's Homestead Pack
Self-reliance projects for the yard you don't own — container yields, a raised bed built to move with you, balcony preservation basics, and the landlord questions to ask first.