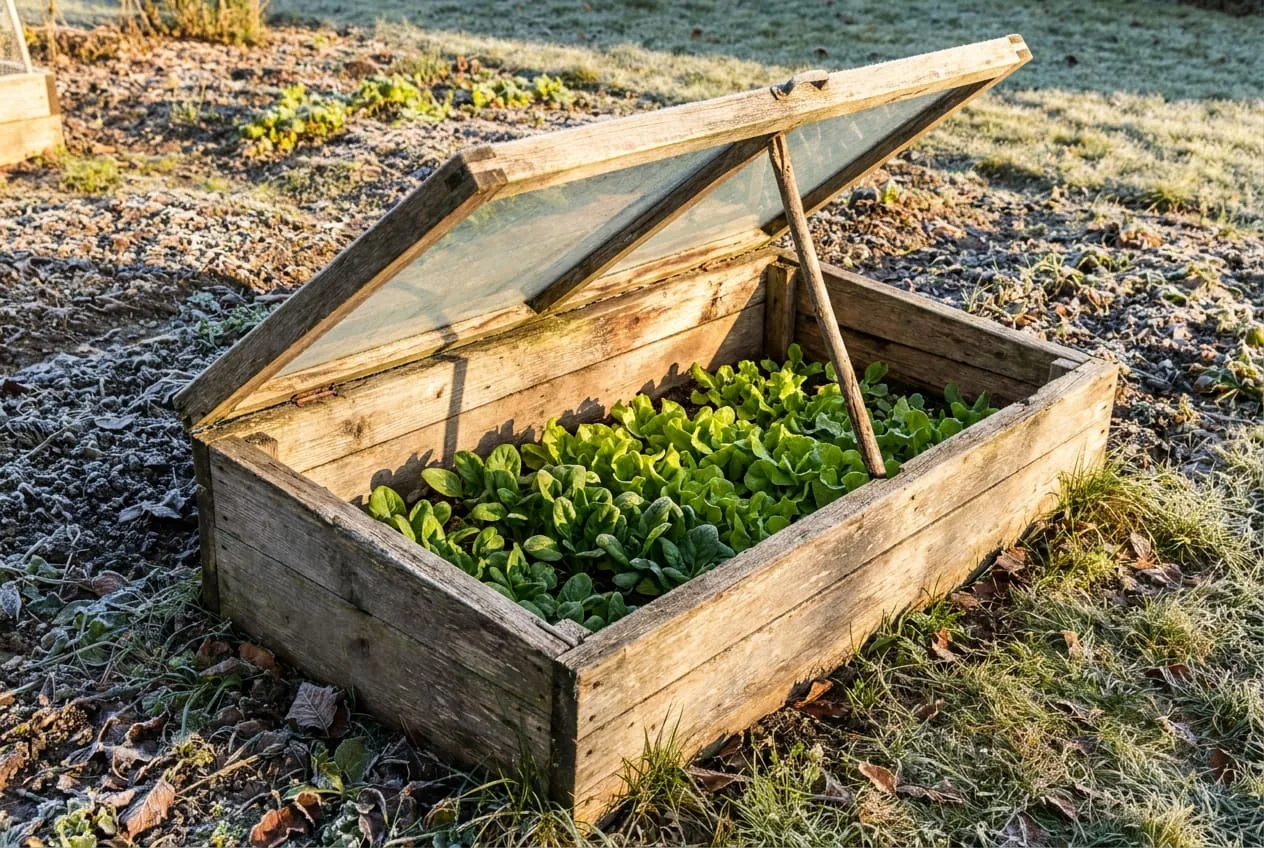
A cold frame is the most useful structure most gardeners never build. It takes a weekend afternoon, costs almost nothing, and extends your growing season by two to four weeks in both spring and fall (Iowa State University Extension) — letting you start plants earlier in spring and keep them growing later in fall. If you’re growing food seriously, a cold frame is infrastructure, not a project.
The basic idea is simple: a bottomless box with a transparent lid. Sunlight passes through and warms the air inside, the frame holds that warmth overnight, and the temperature inside stays about 5–10°F warmer than outside (University of Vermont Extension). That margin is enough to protect tender crops from light frosts, speed up germination in early spring, and keep salad greens productive well into November in most US climates.
Here’s how to build one that actually works, what to grow inside, and the one thing most guides don’t explain — how to prevent the cold frame from overheating and killing your plants on a sunny day.
How a Cold Frame Works
Before building, it’s worth understanding the physics — because that understanding prevents the most common mistakes.
Cold frames exploit what’s called the greenhouse effect at small scale: short-wave solar energy passes through the transparent glazing and is absorbed by the soil and plants inside, then re-radiated as long-wave infrared energy that can’t escape back through the glass or polycarbonate as easily. The soil and frame heated by the sun during the day radiate that heat at night, keeping the inside warmer (Iowa State University Extension).
The two enemies of a cold frame are:
Cold nights with no insulation. On a hard freeze, even a well-built cold frame won’t protect tender plants without additional help — a layer of row cover over the plants inside, or an old blanket draped over the closed frame.
Hot, sunny days with the lid closed. The temperature inside can change rapidly, and a frame left closed can get warm enough to kill the plants inside (Iowa State University Extension). You must ventilate.
Knowing both of these going in determines how you design and manage the frame.
Design 1: The Reclaimed Window Cold Frame — $0 to $30
The classic cold frame uses an old storm window or reclaimed glass window as the lid. If you can find one at a salvage yard, Habitat for Humanity ReStore, or a neighbor’s renovation trash pile, the lid is free. The frame itself is built from 2×12 lumber to match the window’s footprint.
Why reclaimed windows work well: Glass transmits light well, and old storm windows were built to be weather-resistant. Be cautious with salvaged materials: avoid treated wood, whose preservatives can leach into soil and vegetables, and sand off paint before using salvaged wood (University of Vermont Extension). The weight keeps the lid from blowing off. The main limitation is fixed size — you build the frame around whatever window you find.
Materials for a standard 24×36 inch frame:
- Two pieces of 2×12 lumber at 36 inches (back and front walls — the back taller than the front to create slope)
- Two pieces of 2×12 lumber at 24 inches (side walls, cut at an angle to match the slope)
- One reclaimed storm window, roughly 24×36 inches
- Deck screws and a handle or rope on the lid for easy ventilation
Dimensions that matter:
- Back wall height: 12 inches
- Front wall height: 8 inches
- This creates a slight slope toward the south, which maximizes solar gain and sheds rain
Construction: Cut a 4-inch angle on each side piece so the top edge slopes from the back height (12 inches) to the front height (8 inches). Screw together the four walls. No floor — the frame sits directly on the soil. The window rests on top, held in place by its own weight.
Total build time: about 2 hours. Total cost with a salvaged window: just the lumber.
Design 2: The Polycarbonate Panel Frame — $40 to $80
If you can’t find a reclaimed window, twin-wall polycarbonate sheeting is the better modern choice. It’s lighter than glass, more insulating than single-pane glass, and cuts easily with a utility knife or jigsaw. You can size the frame to whatever dimensions suit your garden layout rather than working around a found window.
Why polycarbonate over glass for a new build:
- Significantly lighter — easier to ventilate without a prop stick flying off
- Twin-wall construction (the two layers with air channels between) provides better insulation than single-pane glass
- Doesn’t shatter if something drops on it
Materials for a 24×48 inch frame:
- 2×12 lumber for the four walls (same slope design as above)
- One piece of 4mm or 6mm twin-wall polycarbonate, 24×48 inches (from a home center or online)
- Weatherstrip foam tape for the seal between the lid and the frame top edges
- A screw-on lid handle and a prop stick or chain for ventilation control
Recommended: Twin-wall polycarbonate panels (Amazon) from greenhouse suppliers come in standard sizes and cut cleanly. Get at least 4mm thickness — thinner sheet flexes too much and doesn’t insulate as well.
Ventilation: The Most Important Thing
Every cold frame guide covers construction. Almost none of them emphasize ventilation enough, which is why so many cold frame gardeners lose crops to overheating in spring.
The rule is simple: when the air inside the frame rises above 85°F, the lid needs to be propped open, and it should be closed again before sunset (Iowa State University Extension). On sunny days, that can happen even when it feels cool outside, so check with a thermometer. Overheated lettuce and spinach wilt and bolt.
The prop stick system: Cut a wooden dowel or stick into two lengths — a short one (2–4 inches) for a small crack on cool days, and a longer one (8–12 inches) for wider ventilation on warmer days. Rest the stick between the lid and the frame wall. This is the traditional system and it works fine.
A better automated option: Automatic solar vent openers (Amazon) use gas- or wax-filled cylinders that expand and push open the cover as temperatures rise (Iowa State University Extension), then close it as it cools. A good one eliminates the need to remember to vent every morning. Worth the investment if you’re not home during the day.
What to Grow, and When to Plant It
The crops that perform best in cold frames are cool-season greens and root vegetables — the ones that would normally be wiped out by frost in fall or that need warmth to germinate reliably in early spring.
| Crop | Start in Cold Frame | Harvest Window |
|---|---|---|
| Spinach | Late January (spring) or August (fall) | March–May, Oct–Dec |
| Arugula | February (spring) or September (fall) | April–May, Oct–Nov |
| Lettuce (loose leaf) | February (spring) or September (fall) | March–May, Oct–Nov |
| Kale | Late summer for fall/winter | October through February |
| Carrots | March (spring) | May–June |
| Radishes | Late February (spring) | April |
| Asian greens (bok choy, tatsoi) | September | October–November |
Two distinct uses:
Spring use: Start cool-season crops like lettuce, spinach, and radishes two to four weeks earlier than you’d plant them outdoors; in Iowa, where these crops typically go in during early April, that means starting in March (Iowa State University Extension). By the time your main garden is ready to plant, you’ve already been harvesting greens for weeks.
Fall/winter use: Plant greens in late August or September that will continue producing through frost. With adequate moisture and fertilization, most cool-season crops continue to grow through early winter in a cold frame, and depending on the harshness of the winter, a frame may keep providing greens through the cold months (NC State Extension). In colder zones, you’ll eventually lose even cold-hardy varieties, but row cover inside the frame on the coldest nights extends production.
Cold Frame vs. Row Cover vs. Hoop House
It’s worth understanding where a cold frame fits relative to other season extension tools, because they’re not interchangeable.
| Tool | Protection Level | Best For | Cost |
|---|---|---|---|
| Cold frame (glass/poly) | About 5–10°F above ambient (UVM Extension) | Small-scale greens, seed starting | Low |
| Floating row cover | About 4–5°F of frost protection (NC State Extension) | Large beds, in-ground crops | Low |
| Hoop house (unheated) | Some frost protection; mainly raises daytime temperatures a few degrees (NC State Extension) | Large-scale season extension | Moderate to high |
| Heated greenhouse | Full control | Year-round production | High |
Row cover is the tool for protecting large beds of in-ground crops from occasional light frost — it’s cheap, fast to deploy, and covers a lot of ground. But it provides minimal insulation compared to a cold frame and doesn’t create a sustained warm environment for plant growth.
A cold frame is the tool for actively growing plants through cold weather in a small, managed space. The two tools complement each other: drape row cover over plants inside a cold frame on the coldest nights, and you’ve stacked two layers of protection.
Siting Your Cold Frame
Location matters as much as construction.
Face south (or southeast). The lid should face toward the sun for maximum solar gain; a southern or southeastern exposure with a wall or hedge to the north is ideal (NC State Extension). Positioning the north side of the frame near a home, garage, or fence reduces heat loss (Iowa State University Extension).
Good drainage is essential. A cold frame sitting in a low spot that collects water will rot and create root disease problems. Raise it on a slight grade or improve drainage before siting it.
Wind protection helps. Cold frames against a fence or wall are protected from wind-chill, which accelerates heat loss overnight. A freestanding frame in an exposed spot needs better insulation on the walls (double-layer construction or foam board inside the wooden walls) to hold nighttime temperatures.
Proximity to the kitchen. The cold frame you use most often is the one you can access in winter without slogging through the back of the property. Site it close to where you’ll actually go to harvest in January.
Supplies That Extend Cold Frame Productivity
A few additions that make the difference between a cold frame that sits unused and one you actually rely on:
| Item | Purpose |
|---|---|
| Min-max thermometer (Amazon) | Records overnight lows inside the frame — the only way to know if crops survived a cold night |
| Floating row cover, 1.5 oz (Amazon) | Layer inside the frame on forecast hard-freeze nights |
| Soil block maker (Amazon) | Start transplants in soil blocks inside the frame without plastic trays |
| Outdoor thermometer with probe (Amazon) | Place probe inside frame, read from your kitchen — check before opening the lid |
The min-max thermometer is the most underrated of these. Without one, growers who find wilted or frost-burned plants often can’t tell what actually happened overnight, or whether row cover inside would have prevented it.
Connecting Your Cold Frame to a Larger Food System
A cold frame works best as part of a broader approach to year-round food production. For the crops that cold frames can’t extend — tomatoes, peppers, squash, beans — dehydration, canning, and root storage are the preservation tools. Our solar food dehydrator guide covers how to build a low-cost dryer that handles the summer harvest, and the root cellar guide covers cold storage for produce that doesn’t need processing.
The goal of stacking these systems — cold frame for winter greens, root cellar for stored produce, solar dryer for preserved fruit and vegetables — is a food supply that isn’t entirely dependent on what’s currently in the grocery store. None of these tools requires large investment. Together they cover the main categories of fresh, stored, and preserved food through a full calendar year.
Frequently Asked Questions
- How much warmer is it inside a cold frame than outside?
- Gardeners can expect the inside of a cold frame to be about 5 to 10 degrees warmer than the outside air. On a hard freeze, additional insulation such as row cover over the plants inside helps protect tender crops.
- What can you grow in a cold frame in winter?
- Salad greens (lettuce, arugula, mâche), spinach, kale, chard, and other cold-tolerant vegetables grow well in a cold frame. With adequate moisture and fertilization, most cool-season crops keep growing through early winter in a cold frame, and in milder winters a frame may provide greens throughout the cold months. Avoid tender heat-loving crops like tomatoes and peppers.
- How do you prevent a cold frame from overheating?
- Check the frame often, even on cloudy days, because the temperature inside can change rapidly. Raise the lid when the air inside rises above 85°F, and close it before sunset to hold in heat. A notched prop stick makes it easy to vent at multiple heights.
Sources & references
Before you go
The Renter's Homestead Pack
Self-reliance projects for the yard you don't own — container yields, a raised bed built to move with you, balcony preservation basics, and the landlord questions to ask first.
Free guide
The Renter's Homestead Pack
Self-reliance projects for the yard you don't own — container yields, a raised bed built to move with you, balcony preservation basics, and the landlord questions to ask first.