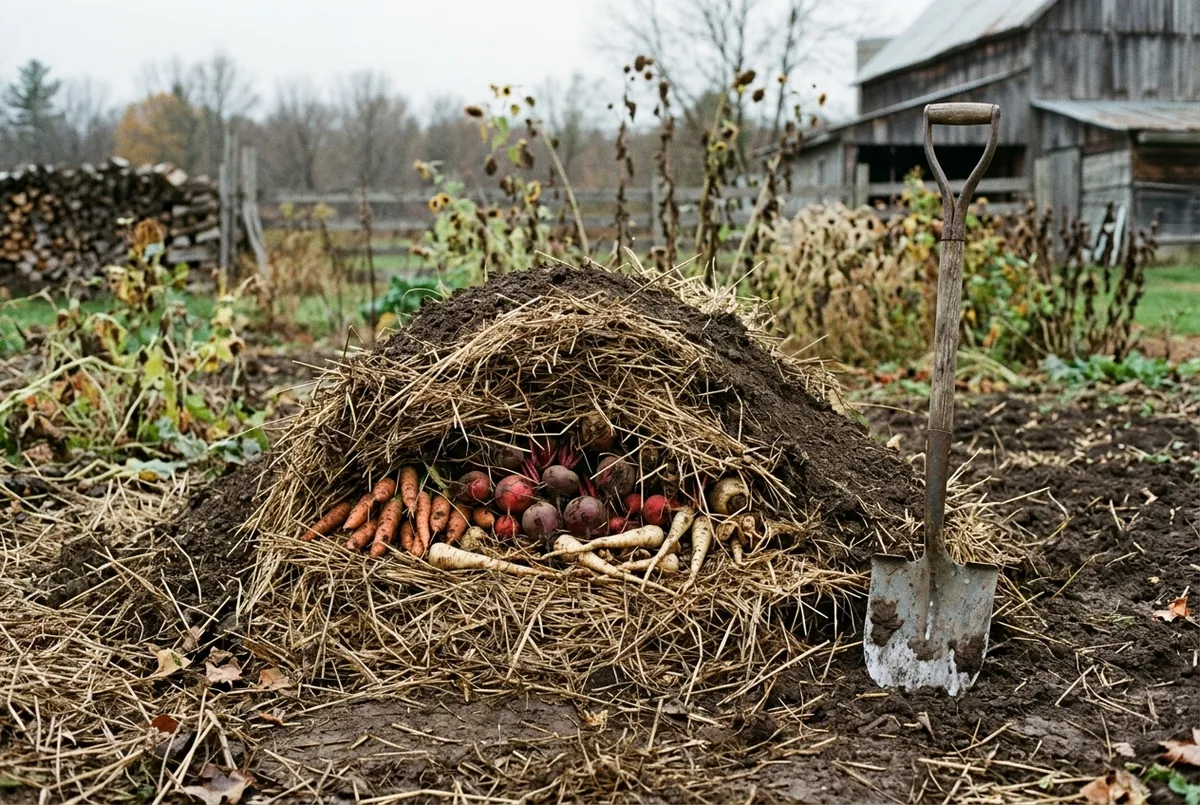
You pulled the last carrots and beets out of the garden bed before the first hard frost, and now they are stacked in the refrigerator crisper, in boxes on the porch, and on every open counter in the kitchen. A root cellar would hold all of it at the right temperature, but pouring footings or digging out a below-grade room is not a weekend project, and a bigger fridge is not a real long-term answer. A root clamp is the old-world alternative: a mound of vegetables layered with sand, straw, and packed soil, built directly on the ground, that holds roots near freezing and near-saturated humidity through the winter without a wall poured.
The short answer: A root clamp is a mound of vegetables layered with sand, straw, and a packed soil cap, built over a drainage trench, that mimics underground cold storage without excavation. Built with the right layers and a ventilation gap, carrots, beets, and parsnips can keep for weeks to months, with parsnips lasting longest at roughly 24 to 26 weeks under ideal conditions.
How Long Different Root Vegetables Actually Keep
Before building anything, it helps to know what the pile is actually capable of holding, and for how long. The numbers below come from Cornell Cooperative Extension’s Cold Storage Chart & Reference Guide, adapted from USDA Bulletin #66 (Cornell Cooperative Extension Vegetable Program). They assume the roots are topped, meaning the leafy greens are cut off, and held at the target temperature and humidity:
- Carrots: 16-20 weeks at 32°F and 90-95% relative humidity
- Parsnips: 24-26 weeks at 32°F and 90-95% relative humidity
- Beets: 7-8 weeks, and rutabagas 8-16 weeks, at 32°F and 90-95% relative humidity
- Potatoes: 24-26 weeks, but at a warmer 38-40°F and a slightly lower 85-90% humidity
Those ranges explain why a clamp works at all. It is a low-cost way to keep a pile of vegetables cold and humid, aiming for conditions close to 32°F and above 90% humidity through a cold winter, which is close to what a below-grade root cellar does with walls and thermal mass instead of straw and soil.
Which Vegetables Belong in a Clamp
The Royal Horticultural Society lists beetroot, carrots, parsnips, swedes (rutabagas) and turnips as suited to this kind of storage, and suggests a clamp when you have large quantities of roots and limited storage space under cover (Royal Horticultural Society). Parsnips have the longest storage life in the Cornell chart, roughly 24 to 26 weeks, which makes them good candidates for a first attempt. For a broader list of what else suits cold storage beyond a single mound, our fall vegetables for root cellar storage list covers the wider range of crops worth setting aside for winter.
Potatoes are the exception worth flagging early, before you build anything: their storage temperature and humidity are different enough from the rest of this list that they need their own space, not a spot mixed directly against the carrots and beets.
Root Clamp vs. Indoor Sand Storage
A clamp is not the only option for keeping vegetables cold and humid without a cellar, and it is not the right choice for every yard. Renters and anyone without ground to dig into can get a similar effect indoors, layering the same roots in sand or slightly damp sawdust inside plastic bins or a wooden box, kept in an unheated garage, porch, or basement corner that stays cold but does not freeze solid (Royal Horticultural Society; Iowa State University Extension and Outreach). The tradeoff is capacity and duration: an indoor bin is easier to check and does not require digging, but it is limited to whatever cold, humid space is already available, while an outdoor clamp can hold a much larger harvest and, per the Cornell numbers above, keep some roots through most of the winter and into spring. For a yard with the space and the drainage to support it, the clamp is the higher-capacity option; for a small lot or a rental, sand-layered bins in the coldest available indoor space are the fallback.
Materials and Tools You Will Need
None of this requires specialty gear:
- A round-point shovel and a spade, for cutting the trench and packing the soil cap
- Sand or light, sandy soil for the base layer
- Straw bales for the base, mid, and cap layers
- A wheelbarrow or garden cart to move sand and soil to the site
- Work gloves, since sorting and stacking roots by hand for an afternoon adds up
- Optional: an outdoor thermometer and humidity gauge, to check conditions near the ventilation point without opening the cap
Choosing and Preparing the Site
Pick sheltered, well-drained ground
RHS recommends a sheltered, well-drained site as the starting point for a clamp. Water pooling under or beside the mound is the fastest way to rot the pile from the bottom up, so rule out low spots in the yard, drainage swales, or anywhere puddles sit after an ordinary rain. A gentle slope that already sheds water is a better site than flat, low ground, even if it sits a little farther from the house.
Dig a perimeter trench
Before building the mound, dig a shallow trench around the perimeter of the site to carry rainwater and snowmelt away from the base. This step is easy to skip when the ground looks firm and dry on the day you build, but it is what keeps a wet fall storm or a mid-winter thaw from soaking the sand base from underneath, weeks later, once you are not paying close attention to the site anymore.
Sort and clean the harvest
Only clamp vegetables that are free of cuts, bruises, and soft spots. A single damaged root can start rot that spreads through the whole pile before it is visible from the outside, and by the time the soil cap shows signs of trouble, the damage is usually already done. Cut the tops off, since the storage benchmarks above are for topped roots, brush off loose soil rather than washing the vegetables, and let them air-dry for a few hours before layering so surface moisture is not sealed into the pile.
Building the Clamp Step by Step
Lay the base
Start with roughly an 8-inch layer of sand or light, sandy soil on the trenched site, then top that with a layer of straw. The sand base keeps the vegetables from sitting in direct contact with bare earth and helps drain moisture away; the straw layer sits between the sand and the roots themselves as the first buffer.
Mound the vegetables
Pile the sorted roots into a mound roughly 3¼ feet, or about 1 meter, high. Build it rounded and sloped rather than flat-topped or squared off. A dome sheds rain and snow the way a roof does, while a flat top collects water and holds it against the cap, which is part of why traditional clamps have always looked like a low haystack rather than a bin.
Add the straw and soil layers
Cover the mound with another 8-inch layer of straw, then finish with a 6-inch layer of soil. Pack the soil smooth with the back of a spade so rain runs off the surface instead of working its way through to the straw and vegetables underneath. The packed surface does the same job a cellar’s walls and door do: keeping outside weather out while holding internal conditions steady.
Leave a ventilation chimney
This is an easy step to skip, and it is the one RHS calls out specifically. Leave a tuft of straw poking through the soil cap to act as a chimney for excess heat and moisture to escape (Royal Horticultural Society). Without that vent, moisture from the vegetables themselves stays trapped in the pile, where it can encourage rot.
Why Potatoes Need Their Own Clamp
It is tempting to build one mound for everything that came out of the garden at once, but the storage numbers argue against it. Potatoes hold at 38-40°F and 85-90% humidity, several degrees warmer and a few points drier than the 32°F and 90-95% humidity that carrots, beets, parsnips, and rutabagas want. Piling potatoes directly against the colder, damper roots either chills the potatoes below their comfort range or keeps the other roots warmer and wetter than the chart supports. A second, smaller clamp, or a clearly separated section of the same mound with its own soil cap and its own chimney, keeps both groups at the conditions the storage data actually calls for, instead of splitting the difference and shorting both.
Sizing the Clamp to Your Harvest
A single large mound is not the only option, and for most home gardens it is not even the best one. Splitting a harvest into two or three smaller clamps, rather than one large pile, means only one mound needs to be opened at a time when you go out for vegetables, leaving the others sealed and undisturbed. Smaller mounds are also easier to build correctly in a single afternoon, and easier to size to what a household will actually use before spring, rather than guessing at one large pile that either runs short or gets opened repeatedly long before its contents are used up.
Checking the Clamp Through Winter
Once the clamp is built and capped, resist the urge to open it and check on it every week. Each opening lets in outside air, disturbs the seal, and undoes some of what the layering was built to hold steady. A periodic check, especially after a hard freeze or a heavy thaw, is enough to confirm the soil cap has not cracked or eroded and that the ventilation chimney is still open rather than packed shut with settled soil or ice. Watching conditions near the ventilation point gives a rough read on what is happening inside the mound without digging into it and breaking the seal.
Track what comes out of the clamp the same way you would track anything else in a food storage plan: oldest roots first, so nothing sits at the bottom of the pile past the point where it is still good. Our FIFO pantry rotation guide covers a simple system for working through stored food in the order it was put away, which applies just as well to a clamp as it does to shelf-stable jars.
A root clamp is a one-afternoon build with materials most gardeners already have on hand or can source locally: a shovel, sand, straw, and soil. Before the first hard freeze locks up the ground, confirm the site drains well, sort the harvest for damage, and plan on a separate pile or section for potatoes rather than mixing them in with everything else. Getting this one traditional storage method right, using benchmarks instead of guesswork, is the kind of groundwork that carries over to every other piece of a self-sufficient backyard.
Frequently Asked Questions
- How long will carrots keep in a root clamp?
- Topped carrots typically hold 16-20 weeks at 32°F and 90-95% relative humidity, per Cornell Cooperative Extension's Cold Storage Chart, adapted from USDA Bulletin #66.
- Can potatoes go in the same clamp as carrots and beets?
- Not ideally. Potatoes keep best at 38-40°F and 85-90% humidity, warmer and drier than the 32°F and 90-95% humidity carrots, beets, and rutabagas need, so the Cornell storage numbers argue for clamping potatoes separately.
- Why does a root clamp need a straw chimney?
- The Royal Horticultural Society says to leave a tuft of straw emerging from the soil cap as a chimney so excess heat and moisture can escape; without it, that moisture stays trapped in the pile, where it can encourage rot.
- Which vegetables work well in a clamp?
- RHS lists beetroot, carrots, parsnips, swedes (rutabagas) and turnips as suited to this kind of storage. Parsnips keep the longest, roughly 24-26 weeks at 32°F and 90-95% humidity, per Cornell's storage chart.
- How is a root clamp built?
- RHS describes a sheltered, well-drained site with a perimeter drainage trench, an 8-inch base of sand or light sandy soil topped with straw, a mound of vegetables about 3 1/4 feet high, another 8-inch straw layer, and a 6-inch packed soil cap left with a ventilation gap.
Sources & references
Before you go
The Renter's Homestead Pack
Self-reliance projects for the yard you don't own — container yields, a raised bed built to move with you, balcony preservation basics, and the landlord questions to ask first.
Free guide
The Renter's Homestead Pack
Self-reliance projects for the yard you don't own — container yields, a raised bed built to move with you, balcony preservation basics, and the landlord questions to ask first.